Precompiling ASP.NET MVC applications with Teamcity & Octopus

Notice the first time you open a page or view in your ASP.NET MVC application, it’s takes quite a bit longer, and subsequent loads are faster? This is because they are compiled on-demand by IIS the first time someone tries to access them – dynamically being turned into an alpha-numerically named DLL. There are quite a few problems with this process:

  • Some errors in your razor code won’t be made apparent until the view is compiled after being accessed for the first time. If you follow the principle of “crash early”, then you’ll agree the web server is much too late for this to happen!
  • Web servers are meant to serve web requests, not compile code. Compiling views comes with a performance overhead that may affect the performance of concurrent requests.
  • If a user is unlucky enough to be the first to access a view they will be met with a long load time, giving a poor impression that something may be wrong.

In this post I will show you how to setup true precompilation for your ASP.NET application. The goal is to package our entire web application, including views, into one or more DLL files. This comes with many benefits:

  • Any compilation errors in your razor code are found well before any code is deployed to a web server.
  • Compilation is done on your build server, allowing you to create a deployment package that requires no additional compiling on the web servers.
  • Users are no longer victim to long load times the first time a view is accessed.

I am assuming that you already have a build and deploy process setup using Teamcity and Octopus. I will be showing you the small tweaks necessary to that process to make precompilation work.

Setup a Publishing Profile

We’re going to leverage publishing profiles as a way of instructing MSBuild on how to compile our project.

  1. Start by right clicking your web project in Visual Studio and clicking Publish…
  2. You will be asked to select a publish target. Select Custom and enter a profile name when prompted
  3. Under publish method select File System
  4. Under target location enter $(ProjectDir)precompiled and click next
  5. Select the build configuration you want to apply, and under File Publish Options make sure both options to delete all existing files prior to publish and precompile during publishing are both checked
  6. Click the Configure button that is next to the precompile during publishing option. Details on all the options in this window are documented on MSDN. For now we will make sure the allow precompiled site to be updatable option is unchecked. Select the option to Merge all outputs to a single assembly and enter a name for the DLL file, for example MyWebProject.Precompiled
  7. Close out of the dialogs. You can push the publish button to test your profile. Once the compile is complete, you should be able to go into your project directory and see a new folder called precompiled. Inside of it you will find the bin folder where you will see some new compiled DLL’s that weren’t there before. Those are your precompiled views.

If you look in the Properties folder in your project you should have a new folder called PublishProfiles containing an xml file with the profile configuration. Here is a sample of what it may look like:

<?xml version="1.0" encoding="utf-8"?>
<!--
This file is used by the publish/package process of your Web project. You can customize the behavior of this process
by editing this MSBuild file. In order to learn more about this please visit http://go.microsoft.com/fwlink/?LinkID=208121. 
-->
<Project ToolsVersion="4.0" xmlns="http://schemas.microsoft.com/developer/msbuild/2003">
 <PropertyGroup>
 <WebPublishMethod>FileSystem</WebPublishMethod>
 <LastUsedBuildConfiguration>Release</LastUsedBuildConfiguration>
 <LastUsedPlatform>Any CPU</LastUsedPlatform>
 <SiteUrlToLaunchAfterPublish />
 <LaunchSiteAfterPublish>True</LaunchSiteAfterPublish>
 <PrecompileBeforePublish>True</PrecompileBeforePublish>
 <EnableUpdateable>False</EnableUpdateable>
 <DebugSymbols>False</DebugSymbols>
 <WDPMergeOption>MergeAllOutputsToASingleAssembly</WDPMergeOption>
 <UseMerge>True</UseMerge>
 <SingleAssemblyName>MyWebProject.Precompiled</SingleAssemblyName>
 <ExcludeApp_Data>False</ExcludeApp_Data>
 <publishUrl>$(ProjectDir)precompiled</publishUrl>
 <DeleteExistingFiles>True</DeleteExistingFiles>
 </PropertyGroup>
</Project>

MSBuild Precompiling Views in Teamcity

Now that we have a publishing profile setup, the next step is to automate the precompilation step in Teamcity.

  1. Add a new MSBuild step to your current build configuration (you do have one setup already to compile your project, right?). We will want this to be one of the last steps in our configuration.
  2. Give it a name, point the build file path to your solution file, and set the command line parameters to the following:
/p:DeployOnBuild=true
/p:PublishProfile=<YourPublishProfileName>.pubxml
/p:VisualStudioVersion=14.0
/p:Configuration=Release
/p:AspnetMergePath="C:\Program Files (x86)\Microsoft SDKs\Windows\v8.1A\bin\NETFX 4.5.1 Tools"

And that’s it, Teamcity will invoke MSBuild using the publishing profile we created earlier, and generate the precompiled DLL’s.

If you are going to be deploying using Octopus, make sure the Run OctoPack option is checked in the build step.

Creating an Octopus Package

The last step is to take our precompiled application and package it up for octopus to deploy. The first thing we need to do is create a .nuspec file in our project, make sure it has a build action property of Content. This will tell OctoPack how and what to package in our project. Name the .nuspec file the same as your web project and enter the following:

<?xml version="1.0"?>
<package xmlns="http://schemas.microsoft.com/packaging/2010/07/nuspec.xsd">
 <metadata>
  <id>MyWebProject</id>
  <title>MyWebProject</title>
  <version>0.0.0.0</version>
  <authors>Me</authors>
  <description>The MyWebProject deployment package</description>
  <releaseNotes></releaseNotes>
 </metadata>
 <files>
  <file src="precompiled\**\*.*" target=""/>
  <file src="Web.*.config" target=""/>
 </files>
</package>

Basically we’re telling OctoPack some basic information about our project, and to include everything in the precompiled folder into our package. We are also asking Octopack to include any extra config transformations, this is optional but necessary if you wish to perform config transformation during your Octopus deploy process.

That should be it. Now when TeamCity runs, it will tell MSBuild to precompile all your views into one or more DLL’s using the publishing profile you created. Once that is done it will invoke OctoPack which will look at the nuspec file in your project and create an Octopus package containing the contents of the precompiled folder. You can then push that package to your Octopus server where it can then be deployed to your web servers.
Load and View .img Files in Garmin Basecamp

If you have an .img file on your Garmin GPS device and you want to view the same map in BaseCamp, there’s a way of loading it in without any complex conversion utilities. The map will also load in BaseCamp just as quickly as if it was installed on your machine. These instructions are for Windows and assume your .img file isn’t locked and doesn’t require authentication to view.

  1. Download and install ImDisk Virtual Disk Driver. Once installed, open Control Panel and select ImDisk Virtual Disk Driver
  2. Click Mount New…
  3. In the Mount New Virtual Disk window that appears:
    1. Select any Drive Letter
    2. Set the Size of Virtual Disk to be slightly larger than the .img file you want to view. For example, if your .img file is 3.5GB create a virtual disk that is 4GB in size.
    3. Make sure Removable Media is checked
    4. Leave the other fields with their default values
  4. Press OK
  5. Open File Explorer and open the drive letter that you set earlier. You should be prompted to format the disk you just created. Select Format Disk
  6. Make sure the File System is set to FAT32 and that Quick Format is checked. Press Start
  7. Once the drive has been formatted, create a folder named Garmin inside of it
  8. Copy your .img file into the Garmin folder you just created
  9. Download and install JaVaWa Device Manager. Once installed, open the program
  10. Press Scan Drives
  11. Click the Manage Maps button for the drive you just created
  12. Select the .img file in the window that appears and click the Visible in BC button.
  13. Click Yes to confirm that you want to change the visibility of the .img file
  14. Close JaVaWa Device Manager
  15. Open BaseCamp. Wait a while and your drive should appear as a Memory Card on the left hand side listing the map inside of your .img file.
  16. Open the Maps menu at the top and select the map inside your .img to view it

At this point you should be able to view the map in BaseCamp. However, you will find that if you restart your computer, the virtual disk you created will disappear. To save you from having to repeat the steps above to recreate the virtual disk, you can create a snapshot of the disk so that you can load it quickly in the future.

To create a snapshot of your virtual disk:

  1. Open Control Panel and select ImDisk Virtual Disk Driver
  2. Select the drive you wish to create a snapshot of and click the Save Image… button
  3. Press OK and select a location to save your .img file

To quickly recreate the virtual disk after a shutdown or restart:

  1. Open Control Panel and select ImDisk Virtual Disk Driver
  2. Click Mount New…
  3. In the Mount New Virtual Disk window that appears:
    1. Select the Image File of the snapshot you created. This is NOT the .img file of your Garmin map, select the .img file you created with ImDisk earlier
    2. Select any Drive Letter
    3. Make sure Virtual Disk Drive Accesses Image File Directly is selected
    4. Make sure Removable Media is checked
    5. Leave the other fields with their default values
  4. Press OK. Your virtual disk should be created and mounted. You can now open BaseCamp to view your map

This method has been confirmed to work on Windows 8.1 with Basecamp 4.6.2, ImDisk 2.0.9 and JaVaWa Device Manager 3.8

Compile Time View Validation in ASP.NET MVC

Open up your favorite .cshtml file, put the mouse cursor in the middle of some razor code, and have a cat walk across your keyboard. If you don’t have a cat nearby, rolling your face on your keyboard will also suffice. You should start seeing things highlighted and underlined in red. Now go ahead and build your project.

Build Succeeded – Really?

Unlike all the other code in your project, your view files are not compiled when you hit the Build button in your IDE. Instead, they are compiled on-demand by IIS the first time someone tries to access them – dynamically being turned into an alpha-numerically named DLL. The problem is that any errors you have in your views won’t be made apparent until IIS tries to compile them, at which point the user who requested the view would see an error page. So how do you protect yourself from this happening?

Pre-compilation To The Rescue

Pre-compiling Razor views is possible, there are projects out there that will allow you to turn your views into DLL files before they even touch an IIS server. However doing so in this case would be overkill, we just want to know if there are obvious errors in our views.

To let you find those compile-time bugs there’s a flag you can set in your .csproj file.

<MvcBuildViews>true</MvcBuildViews>

This will cause your views to be test compiled when your project is built. Why do I emphasize test compiled? Because they aren’t compiled in the traditional sense that you end up with resulting DLL files, they will still need to be dynamically compiled by IIS later on. It’s just a test to see if when they are compiled by IIS, if any errors will be thrown.

You will find that this setting is false by default, and there’s a good reason for that – view compilation takes time. In a large enough project it could take enough time to seriously annoy a developer who is used to those quick compiles. A medium sized project of around 70 views has the compile time grow by 36 seconds when this feature is enabled.

But there’s a compromise, instead of having your views test compile during every build, we can set it to only test compile when performing a release build. If you look in your .csproj file, you will find a PropertyGroup block for each build configuration in your project. Find your release build configuration and add the MvcBuildViews property. In this example my build configuration is simply called Release.

<PropertyGroup Condition=" '$(Configuration)|$(Platform)' == 'Release|AnyCPU' ">
    <MvcBuildViews>true</MvcBuildViews>
    ...
</PropertyGroup>

This way the debug builds you do on your machine will run fast, while the builds that run on your build server will take a bit longer, while validating that all your views will compile. If a view can’t be compiled, the build fails, and the code will never be deployed to an IIS server.

Opening and Closing Tabs Using Selenium

In this post I reference methods in the Selenium C# client driver. Equivalent methods should exist in whichever other language client driver you use. 


Some testing requires opening a new window, performing an action, then closing that window, perhaps even returning to the original window to continue the test. There are many, many ways of managing tabs in selenium, so lets take a look at what works and what doesn’t.

Tabs = Windows

First of all, Selenium really has no concept of what a tab is and how it differs from a window. Each WebDriver instance has a reference to it’s current window handler, which is points to the current tab or window that driver is interacting with. When managing tabs, we have to be able to create a window handler, switch to it, do some stuff, then switch back to our original window handler.

Creating Tabs

There are many ways of opening a new tab. You could do it by clicking a link, using a keyboard shortcut, initializing a new WebDriver instance, or even typing some JavaScript into the developer console. Unfortunately not all of these methods are reliable in Selenium. For instance, having the WebDriver send the keyboard command “Ctrl + T” would open a new tab when testing locally on my machine, but when running the test using Selenium Remote Server, the keyboard command would be ignored entirely. There are also known bugs related to sending keyboard shortcuts through the WebDriver, some dating as far back as 2012. Initializing a new WebDriver works, but is quite resource intensive and requires having to keep track of the state of multiple WebDriver instances. Clicking a link is also somewhat unreliable since Selenium doesn’t handle links using target="_blank".

The most reliable method I have found is to create your tabs using JavaScript. This is done by simply executing a window.open().

Switching Window Handlers

So now you have a new tab in your browser, but you still need to tell your WebDriver to switch to it, otherwise commands will continue to be sent to the original tab. This is actually pretty easy and is done using the SwitchTo() command into which you pass the window handler that you want to switch to.

The Code

So putting everything together, here is what the code would look like to:

  • Create a new tab
  • Switch to it
  • Do something in the new tab
  • Close the new tab
  • Switch back to our original tab
// save a reference to our original tab's window handle
var originalTabInstance = myWebDriverInstance.CurrentWindowHandle;
// execute some JavaScript to open a new window
myWebDriverInstance.ExecuteJavaScript("window.open();");
// save a reference to our new tab's window handle, this would be the last entry in the WindowHandles collection
var newTabInstance = myWebDriverInstance.WindowHandles[Driver.Instance.WindowHandles.Count - 1];
// switch our WebDriver to the new tab's window handle
myWebDriverInstance.SwitchTo().Window(newTabInstance);
// lets navigate to a web site in our new tab
myWebDriverInstance.Navigate().GoToUrl("www.crowbarsolutions.com");
// now lets close our new tab
myWebDriverInstance.ExecuteJavaScript("window.close();");
// and switch our WebDriver back to the original tab's window handle
myWebDriverInstance.SwitchTo().Window(originalTabInstance);
// and have our WebDriver focus on the main document in the page to send commands to 
myWebDriverInstance.SwitchTo().DefaultContent();

This approach works when executing tests both locally and remotely. Keep in mind that you can only execute a window.close() on a tab that was initially opened using a window.open().

Uninstalling all apps in Windows 10

A clean install or upgrade of Windows 10 will include several apps preinstalled. These include:

  • 3D Builder
  • Alarms and Clock
  • Calculator
  • Calendar
  • Mail
  • Camera
  • Contact Support
  • Get Office
  • Get Skype
  • Get Started
  • Groove Music
  • Maps
  • Microsoft Solitaire Collection
  • Money
  • Movies & TV
  • News
  • OneNote
  • People
  • Phone Companion
  • Photos
  • Store
  • Sports
  • Voice Recorder
  • Weather
  • Windows Feedback
  • Xbox

Phew! That’s a lot of bloatware. For most of them uninstalling is simply a matter of right clicking on the shortcut or tile and selecting “Uninstall”. But many apps do not have this option since they are built into Windows.

I’m going to show you a way of removing all these apps at the same time, allowing you to start with a clean slate.


WARNING! This will remove all Store Apps on your machine, with the exception of Microsoft Edge and Cortana. This will also remove the Store app. I will show you how to reinstall the Store app a little later below.


  1. Open up Powershell as an administrator. This can be done by quickly searching for Powershell in the search box in the task bar and right clicking it to open as an admin.
  2. Run the following command: Get-AppxPackage -AllUsers | Remove-AppxPackage
  3. Then run the following command: Get-AppXProvisionedPackage -online | Remove-AppxProvisionedPackage

Once this is done you should notice that all the apps listed at the start of my post should be gone! Notice that the Store app was also removed, if you’re fine with that then you’re job is done. But if you want to install some useful apps like Calculator or Mail we will need to restore the Store.

Reinstalling the Store App

These instructions are from Microsoft but I will repeat them here incase they are taken down.

  1. Download the Reinstall-preinstalledApps.zip PowerShell Script to your PC and copy it to your desktop. If the link doesn’t work create a file called reinstall-preinstalledApps.ps1 and copy the following code into it:
  2. Open an elevated PowerShell window.
    1. Click Start.
    2. Type “Windows PowerShell” in the search bar.
    3. Right-click Windows PowerShell in the results list and click “Run as administrator”.
    4. A User Account Control dialog displays. Click “yes” to proceed.
  3. Navigate to the script download folder, which is your desktop if you followed step 1. Your command will look similar to the following:
    PS C:\Users\Abby>CD Desktop
  4. Temporarily allow unsigned PowerShell scripts to execute. Your command will look similar to the following:
    PS C:\Users\Abby\Desktop>Set-ExecutionPolicy Unrestricted
  5. Add a string argument to the powershell command that represents the string containing the name of the app. In our example of the Windows Store, the string is *Microsoft.WindowsStore* (asterisks included). Your command will look similar to the following:
    PS C:\Users\Abby\Desktop>.\reinstall-preinstalledApp.ps1 *Microsoft.WindowsStore*
    The system will prompt for approval to execute the script. Typing “y” will allow the script to continue.
  6. Re-enable enforcement for signed PowerShell scripts. Your command will look similar to the following:
    PS C:\Users\Abby>Set-ExecutionPolicy AllSigned

You should now see the Store app available. Before you start installing other apps from the store I suggest opening the “Downloads” screen from the top right menu and selecting “Check for Updates”.

Adjusting Zoom Level To Add Padding To Map Bounding Boxes – Bing Maps V7

Suppose you have a cluster of map pins, and you want the map to zoom and center on those pins such that they all fit on the user’s screen. This is normally accomplished by passing a list of pins into a helper method that spits out  a bounding box, you then set your map’s view to that bounding box.

The problem with this approach is that you will always end up with at least 2 pin from your cluster appearing on the absolute edge of your bounding box, which translates to being on the precise edge of the user’s screen. And depending on how your pins appear, it may be entirely invisible to your user, who may not realize they have to pan their view slightly to view the missing pin.

The solution is to add padding to the edges bounding box, so that we can be sure that all pins appear in the user’s view with some space to spare from the edges of the map. We can accomplish this by adding two fake pins (that won’t appear on the map) to our list of pins, positioned in such a way that they stretch the bounding box by a percentage of it’s original size.

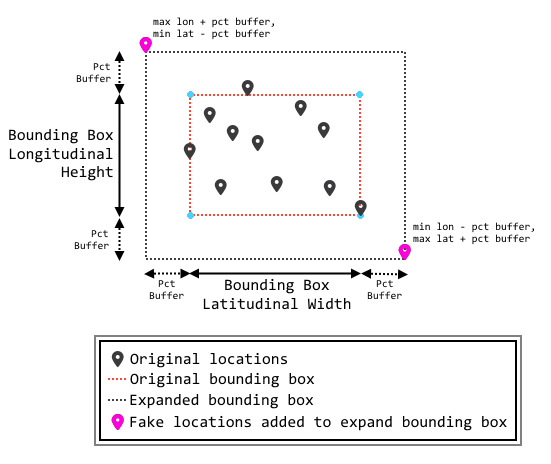
Here is a diagram of what this approach looks like:

bingbounding

The solution can be broken down as such:

  1. While populating our list of pins to create our bounding box, keep track of the maximum and minimum values of both longitude and latitude for all pins. This will give us the boundaries of the original bounding box.
  2. Using the maximum and minimum values for both longitude and latitude, we can calculate the latitudinal width and longitudinal height of our original bounding box.
  3. We can apply an arbitrary percentage to the height and width of the bounding box and calculate the coordinates needed for our two fake pins. These fake pins will be outside of the original bounding box, and when added to our list of pins, will force the resulting bounding box to grow based on the percentage used in the calculations.
  4. Input the modified list of pins into the bounding box helper method, returning an expanded bounding box.

So what does this look like in code? (Bing Maps AJAX v7.0)

function focusOnPinCluster(cluster) {
	// array that stores our list of pin locations
	var locations = [];

	var maxLat = -90;
	var minLat = 90;
	var maxLon = -180;
	var minLon = 180;

	// populate the locations array with the passed in pins
	for (var i = 0; i < cluster.length; i++) {
		var pin = cluster[i];
		locations.push(new Microsoft.Maps.Location(pin.Latitude, pin.Longitude));

		// update max lat/long values
		if (pin.Latitude > maxLat) { maxLat = pin.Latitude; }
		if (pin.Latitude < minLat) { minLat = pin.Latitude; }
		if (pin.Longitude > maxLon) { maxLon = pin.Longitude; }
		if (pin.Longitude < minLon) { minLon = pin.Longitude; }
	}

	// add 2 locations that push the bounding box out by a % of its size
	var pctBuffer = 0.05;
	var latBuffer = (maxLat - minLat) * pctBuffer;
	var lonBuffer = (maxLon - minLon) * pctBuffer;

	// add the two fakes pins to our location array
	locations.push(new Microsoft.Maps.Location(minLat - latBuffer, maxLon + lonBuffer));
	locations.push(new Microsoft.Maps.Location(maxLat + latBuffer, minLon - lonBuffer));

	// create a bounding box based on our location array
	var bounds = Microsoft.Maps.LocationRect.fromLocations(locations);

	// set the map view to our bounding box
	_map.setView({ bounds: bounds });
}

The result will have our cluster of pins appear zoomed and centered in the map, with a healthy margin between the pins and the edge of the screen.

Preserving folders when backing up lists and collections in Garmin BaseCamp

Garmin BaseCamp (v4.4 as of this post) allows you to export your lists and collections as a GPX file. However GPX files are a “flat” format, meaning that they don’t store your information hierarchically. So upon trying to import your GPX file back into BaseCamp you will find that all the folders you created to organize your lists no longer exist. Instead, everything appears muddled up into one big disorganized collection.

Here is a better way of backing up your BaseCamp data, in the event you need to move it to another computer or just back it up.

To Backup

Find the BaseCamp AppData folder. This location may change depending on what kind of OS you are running. On Windows 8.1 it is located in %APPDATA%/Garmin/BaseCamp/Database. When you find the folder you will see it will contain one or more folders with the version name of BaseCamp they are associated with. Copy the folder (in this case it will be named “4.4”) and put it somewhere safe, this is essentially your backup.

To Restore

Install BaseCamp, it needs to be the same version you backed up from, or a newer one. Delete any existing folders already in the %APPDATA%/Garmin/BaseCamp/Database directory, then simply take the folder you copied earlier and place it into the same directory (the one you originally copied it from). Now start BaseCamp. The neat thing is that even if you backed up from an older version of BaseCamp, it will be smart enough to see the database from an older version and upgrade it to it’s newer version. Your collection should appear organized as it did before with lists in their appropriate folders.

Ignoring time when filtering dates in Telerik Kendo grids

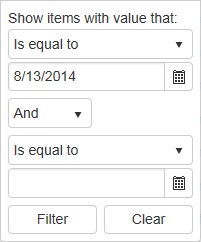
kendofilteringTo the right is what the filter looks like on a Telerik Kendo grid when Filterable(true) is set on a DateTime column.
If I was a user, I would expect the grid to return all rows that match the date (8/13/14) regardless of the time associated with that date. If it’s 8/13/14 02:00 or 8/13/14 17:41, the expectation is that they should all appear because I am asking the grid to show me all the data that occurred on that date.

Instead, the Kendo grid defies that expectation and will only return data that precisely matches the date, at midnight, ie. 8/13/14 00:00:00. I’ve had users who were convinced this functionality is actually a defect, when it was just a case of it being really unintuitive.

So, the goal is to modify the filtering behavior in the grid to effectively ignore the time, and only use the literal date when filtering data. But, still preserve the ability to sort the data by time.

After doing the prerequisite search around the Telerik forums and StackOverflow, it became quite clear that existing solutions hacks are really messy and either involve some trickery in the underlying model that is bound to the grid (ewww, no) or some nasty JavaScript (for the love of kittens, no).

The basis of my solution involves making use of a custom DataSourceRequest attribute that implements a custom model binder. The custom model binder will iterate through the filters being applied to the grid and transform them accordingly.

What do I mean by transform? Here are some examples of what happens:

isEqual("08/13/14")

becomes:

IsGreaterThanOrEqual("08/13/14 00:00:00") AND IsLessThanOrEqual("08/13/14 23:59:59")

And another example:

isLessThanOrEqual("08/13/10") AND isEqual("08/13/14")

becomes:

isLessThanOrEqual("08/13/10 23:59:59") AND IsGreaterThanOrEqual("08/13/14 00:00:00") AND IsLessThanOrEqual("08/13/14 23:59:59")

Using the same logic, I apply it to all the other possible logical operators when filtering (is not equal to, is greater than, is equal to, etc.)

So first, lets starting extending the default Kendo DataSourceRequest attribute:

We will use this attribute to decorate our request data when reading data for our grid. Next, is the heart of our solution which is the custom model binder:

First, notice the recursive calls to TransformFilterDescriptors(), this is to handle cases where the user may be requesting two or more different filters for a field. If you read through the comments in the code you will see where the original filter logic is being translated into a single or composite filter with the time set to 00:00:00 or 23:59:59 to match the appropriate situation.

Finally, we decorate the Kendo DataSourceRequest being passed into our Actions with our new [CustomDataSourceRequest] attribute. Here is what a basic Action would look like:

The added benefit of this is there is absolutely no front end work – no javascript or view model tweaking, and no page or model specific modifications. The solution is generic enough to work across all the grids and models in your application.

The full code from this post is available on Github as a Gist.

Update (2015/05/03): While at the Build 2015 conference I had a chance to speak with some of the folks at Telerik working on Kendo UI. While they do acknowledge that the current DateTime filter behavior isn’t very intuitive, their concern with making it the default is that it will affect people who expect that functionality in existing applications. So it looks like we have to make do with the solution above, at least for now.

Update (2017/11/28): Updated the code to handle the “Is Null” and “Is Not Null” filters for nullable dates. Also updated the logic to support high precision DateTime values. I also want to make a note that if you are filtering UTC DateTime objects, you will need to add a call to  .ToUniversalTime() at the end of any DateTime constructors inside the main switch loop of the TransformFilterDescriptors() method.

Preventing accidental deployments in TeamCity

One-click deployments are exactly that – one click of the “Run” button, and the magic happens. But, if you have a particularly busy project list in TeamCity, you will find yourself constantly double checking which “Run” button you are pressing, for fear of accidently running a deployment into production. It’s an unfortunate consequence of making things too easy – one little misclick can become a big mistake.

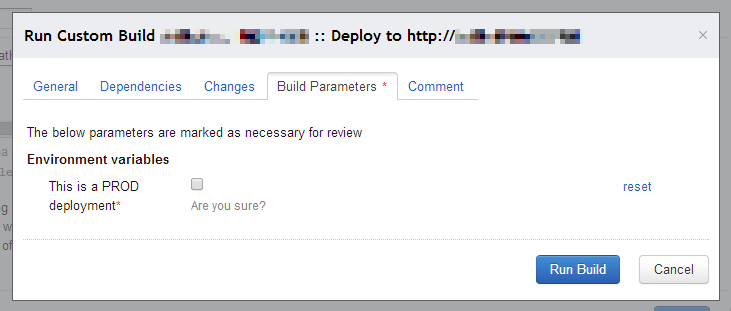
In this post I will show you how to reduce the risk of accidently running a production deployment in TeamCity by introducing a simple safety switch into the build process. At the end, upon pressing the “Run” button you will be presented with a prompt that looks something like this:

oneclickteamcity

The prompt includes a checkbox asking you to confirm that you really want to run the build. If you check it – the build will run as it normally would. If you don’t – it will fail. Effectively turning a one-click deployment into a three-click deployment, with the added benefit of no added training or documentation to other users of your build server.

Step 1

Add a new build step to your build configuration – it should be the very first step that is run. In this example I’ll make it of type Powershell – you can use other script based build types (Gradle, command line, etc.), the script will simply verify if the user has checked the confirm checkbox before the build runs.

Give the build step a name like “Deployment Confirmation”.

Set the Script option to Source code and enter the following into the Script source box:

write-host "##teamcity[message text='Starting confirmation validation...']"
if("%env.Confirm%" -eq "false") {
	write-host "##teamcity[message text='Confirmation validation FAILED' errorDetails='This is a production deployment. The confirm checkbox must be checked to proceed with the deploy process.' status='ERROR']"
	throw "Confirmation validation FAILED"
} else {
	​write-host "##teamcity[message text='Confirmation validation SUCCESSFUL']"
}​

The script basically checks the value of the build parameter %env.Confirm% that is set by the checkbox in the build prompt. If it’s false (unchecked), throw an exception that will kill the rest of the build process. If it is true, don’t do anything, and the build will continue as usual.

The rest of the fields in this build step can be left with their default values. Now would also be a good time to make sure any subsequent steps in your build configuration are set to execute “Only if all previous steps were successful”.

Step 2

Add an environment variable to your build parameters. Name it env.Confirm (make sure if matches the name in the script above) and set the default value to false. Press the “Edit…” button to create a new variable specification. You will be presented with a form with the following fields:

  • Label – this is the text that appears to the left of the checkbox. I set it to something like “This is a production deployment”.
  • Description – this is the text that appears beneath the checkbox. I set it to something like “Are you sure?”.
  • Display – set this to “Prompt”, we want TeamCity to prompt for this value whenever a build is requested.
  • Type – set this to “Checkbox” with the checked value being true and unchecked value being false.

That’s it! From now on when you click the “Run” button, you should get the prompt above. Also note that the build log will contain the message output from the script above so that it becomes very clear why a build failed if someone doesn’t click the confirm checkbox.

One Catch

The only catch I have found with this approach is that despite the default value of our checkbox being set to false, TeamCity has a “feature” that stores the last value of the checkbox in some session state (cookies, session storage, etc.). So if you run a build, enable the checkbox, and five minutes later try to run the build again, the checkbox will already be checked for you. It seems only after twenty minutes or so, or however long it takes for your session to expire, will it reset back to the correct behaviour.

This isn’t a big deal, even if the checkbox is pre-enabled due to this “feature” in TeamCity, the prompt will still appear, so you’re still turning a one-click deployment into a two-click deployment.

Using Assembly.GetCallingAssembly() inside custom HTML helpers in ASP.NET MVC

Suppose you need to get a reference to the assembly that originated the call to a custom HTML helper,  you have probably tried calling Assembly.GetCallingAssembly() within your helper method to achieve this. Instead, it will return an assembly name that you didn’t expect, perhaps something like: App_Web_views.home.index.cshtml.26149570.q0lhhvru. This can happen in several situations, for instance placing your custom HTML helpers in a different class library, or embedding your Razor views in seperate .dlls.

You probably know that by default, ASP.NET web pages (.aspx), user controls (.ascx), and MVC Razor views (.cshtml and .vbhtml) are compiled dynamically on the server by the ASP.NET compiler (although it is possible to pre-compile them). What some don’t realize is that Razor views are compiled as separate assemblies by the ASP.NET runtime. Those assemblies are dynamic, hence the cryptic assembly naming.

For example, you may have code in your index.cshtml file that calls your custom helper:

@Html.GetMyAssemblyName()

And your custom HTML helper:

public static string GetMyAssemblyName(this HtmlHelper htmlHelper)
{
	// returns the name of the dynamically generated dll that 
	// the razor was compiled into
	return Assembly.GetCallingAssembly().GetName().Name;
}

When the Razor code, within its dynamically generated dll, calls the helper method, it will end up returning the name of the dynamically generated dll. So how could you get the name of the project assembly that originally contained the .cshtml Razor view file?

One solution involves digging through the ViewContext to get the Controller that is associated with the view. Unlike views, code files in a web application project are compiled into a single assembly. Once you know the name of the Controller, you can search through the app domain for the assembly that contains it. Here is the modified HTML helper that does this:

public static string GetMyAssemblyName(this HtmlHelper htmlHelper)
{
	var controllerType = htmlHelper.ViewContext.Controller.GetType()
	var callingAssembly = Assembly.GetAssembly(controllerType);

	if(callingAssembly != null)
		return callingAssembly.GetName().Name;

	return null;
}

Not all views have a controller associated with them, for instance, layouts. In this case another way of getting the originating controller would be through calling:

htmlHelper.ViewContext.RouteData.Values["controller"]

And then retrieving the controller type through reflection.

1 of 5
12345